
Replace ink in Epson XP-2200 is a simple process to maintain your printer and get great prints. Most popular all-in-one with wireless printing, a compact and stylish design. The Expression Home XP-4200 is an affordable wireless all-in-one offering wireless for home users looking to print from their tablet or smartphone. Regularly replenish ink to achieve maximum print performance and prevent faded prints or errors.
This guide is a simple, step-by-step walkthrough of how to replace ink in Epson XP-2200. Its a walk-through for both new and returning users to help you get it done quickly.
Also Read: How to Replace HP 950XL and 951XL Ink Cartridges
Why Should You Replace Ink in Your Epson XP-4200?
The Epson XP-4200 works with four single inks: pigment black (for sharp text), cyan, magenta, and yellow dye-based inks. Epson recommends the use of genuine cartridges, as third-party cartridges may damage the firmware according to firmware updates.
Indicators that you need to replace the ink cartridge on the Epson XP-4200 may include:
- Low ink alerts on your printer’s Lcd screen.
- Faded or streaked prints.
- The printer will pause, displaying error messages.
It’s important to replace print heads as soon as possible to ensure good quality prints while printing.
Materials Needed
Before starting, gather the following:
- Actual print times will vary based on system configuration, software, and page complexity. Compare with similar items *Versus weighted average of top 3 competitive products as of Q1 2018.
- A clean, flat surface.
- Paper towels for any unintended spillage.
Note: Purchase and install an Epson Ink Cartridge. Do not remove or close the adjustment program or files.
Preparation Steps
- Turn the printer on, and set it on a flat surface.
- If the low ink message appears on your printer, make a note of which cartridge(s) are running low.
- New cartridges are available; however, leave them sealed, ready but not yet open.
Step-by-Step Guide to Replace Ink in Epson XP-4200
Read this if you want to replace ink in the Epson XP-4200 without any hassles.
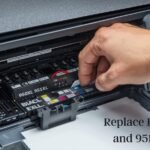
Step 1: Access the Cartridge Area
- If the printer is not turned on already, turn it on.
- If a low ink warning message is displayed, select “How To” on the LCD screen for information on how to manually refill.
- Raise the scanner unit (the top half of the printer) until it clicks into position. This exposes the cartridge holder.
Note: Do not press the print head or anything inside, such as the white cable or translucent film, to avoid damage.
Step 2: Remove the Old Cartridge
- Wait for the cartridge holder to stop in the replacement position (if available).
- Find the cartridge that came with your printer (it may be blinking, or there is an error).
- Press the tab on the cartridge and lift it straight up to remove.
- Set the old cartridge aside on a paper towel.
Important: After the old cartridges are replaced with new ones, leave them in place until you have a new set of cartridges available.
Step 3: New Cartridge Ready to Use
- Unpack the new cartridge.
- For black cartridge only, gently shake 4-5 times (do not shake color cartridges).
- Remove the yellow glue protection film only. Do not peel the serving label or break the seal on any container, as this may cause leaks.
Tip: Hold the cartridges by the black plastic, rather than touching the ink ports.
Step 4: Attach New Cartridge
- Insert a new cartridge in the slot (color codes are black, cyan, magenta, and yellow).
- Push it in straight until it clips! securely into place.
- Repeat for other cartridges if you have more than one.
Step 5: Close and Finish the Process
- Close the scanner unit gently until it clicks.
- The ink in the printer will be automatically filled (takes a few minutes).
- You’re done when the LCD screen says ”Completed.”
- The printer returns to the home position, and the print operation resumes.
Step 6: Test the Installation
- Print a test page or nozzle check pattern in the maintenance menu to see if ink flows.
- If anything goes wrong, run a cleaning cycle.
Common Issues and Troubleshooting
Remanufacturing ink on the Epson XP-4200 is simple. When you do have to change a cartridge in your Epson XP-4200, there are a few common problems that might come up.
- Cartridge not recognized: Ensure genuine Epson cartridges are used and properly seated.
- Ink errors continue: Restart the printer, or search for firmware updates.
- Ink smudges or prints: Perform a print head alignment or cleaning cycle.
- Printer does need all cartridges: The XP-4200 prints with all cartridges; low color ink may not allow you to print.
If the problem persists, refer to the Epson support website or user manual.
Tips for Prolonging Ink Life
- Print frequently to avoid drying.
- Store upright in a cool, dry place.
- Will use XL high-yield cartridges for frequent printing.
- Try Epson’s subscription service for automatic shipments.
Conclusion
Knowing how to replace ink in Epson XP-4200 offers the guarantee of continuous printing and an extended printer life. Using the step-by-step guide below, you can achieve it in less than 10 min with nothing but effort.
Keep your Epson XP-4200 working efficiently for documents, photos, and everyday projects with regular maintenance. If you face any issues, please make use of the official Epson website for further assistance.